Run it in Plugin Playground
Last updated
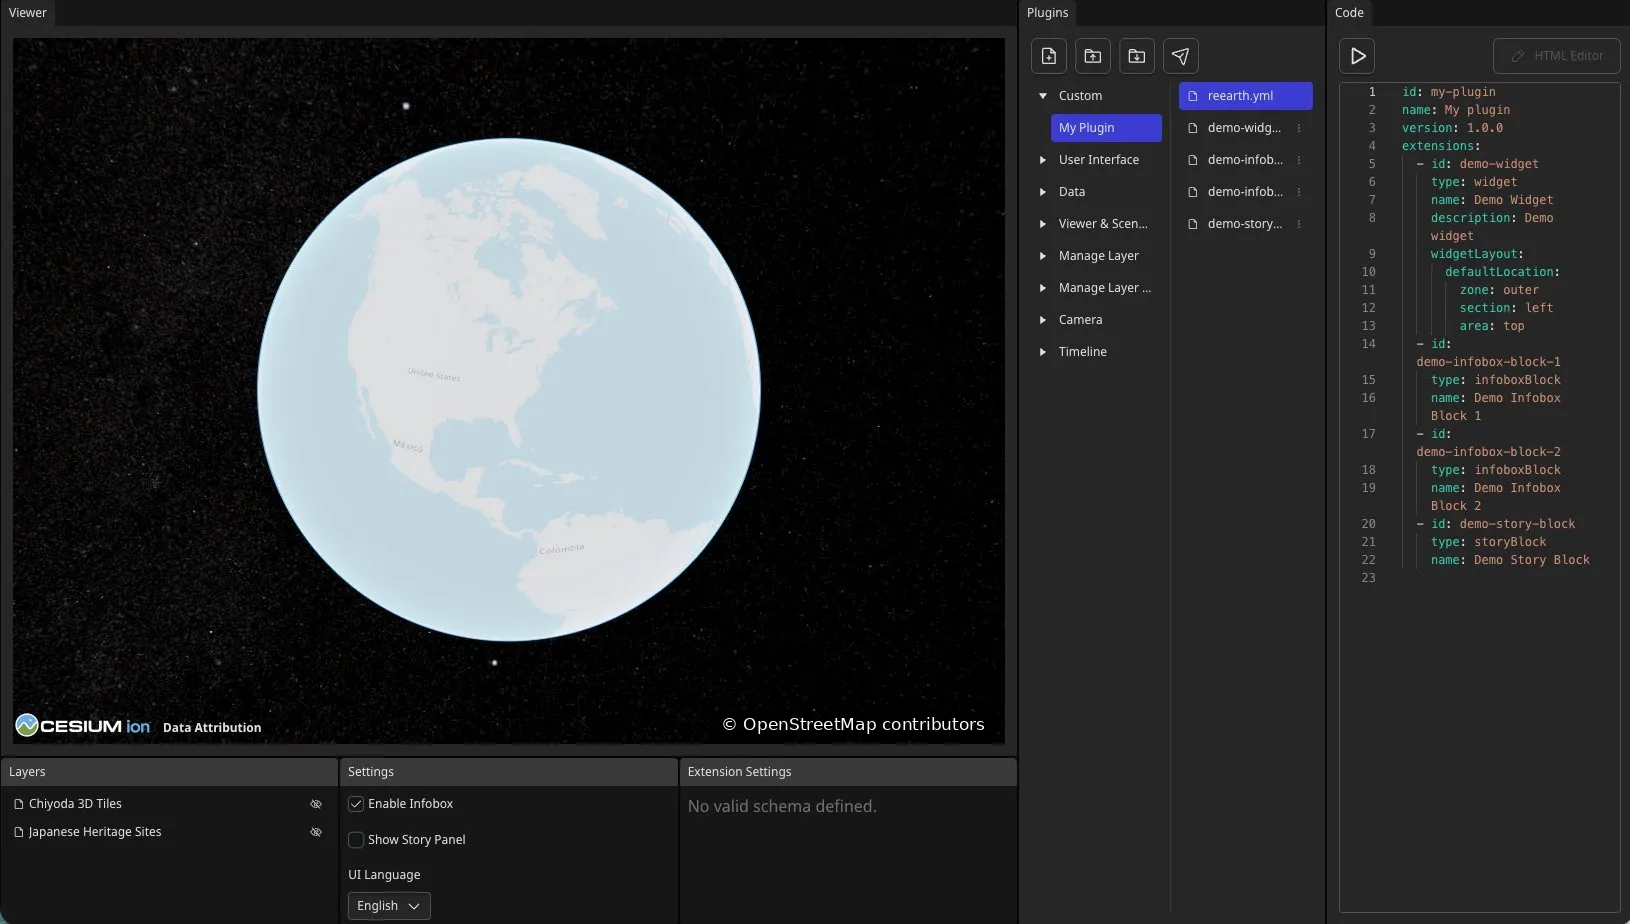
The Plugin Playground is an interactive, in-browser environment for building and testing Re:Earth Visualizer Plugins. It lets you write Plugin code, run it, and see the result on a live map instantly—without installing anything or setting up a local development environment. The core of the Playground is this fast “change, run, observe” loop: because everything happens in one screen with no packaging or installation, you can try an idea and see its effect immediately. This makes it the fastest way to start experimenting with Plugins, whether you are new to them or prototyping an idea.
Open the Playground here: Plugin Playground.
The Playground layout
Section titled “The Playground layout”The Playground is divided into three columns:
- Viewer (left): A live map that shows your Plugin running in real time. Below it are the Layers, Settings, and Extension Settings panels for the current scene.
- Plugins (center): Lists the available Plugins and the files that make up the selected Plugin, such as
reearth.ymland the extension JavaScript files. A row of buttons at the top lets you manage Plugins and files. - Code (right): A code editor that shows the contents of the selected file, where you write and edit your Plugin code.
When you first open the Playground, a default Plugin named My Plugin is already loaded under the Custom category, pre-populated with a reearth.yml file and example extension files. You can run this as-is, or use it as a starting point.
The Plugins panel buttons
Section titled “The Plugins panel buttons”The row of buttons at the top of the Plugins panel lets you manage your work:
- Add file: Adds a new file to the current Plugin.
- Import plugin: Loads an existing Plugin into the Playground.
- Export plugin: Downloads the current Plugin to your computer as a
.zipfile containing thereearth.ymland JavaScript files. This is the same.zipformat you install into a Re:Earth Visualizer project. - Share plugin: Copies a shareable link to the Plugin to your clipboard, so you can send it to others.
Run a preset example
Section titled “Run a preset example”The Playground includes a set of ready-made example Plugins, grouped into categories such as User Interface, Data, Viewer & Scene Settings, Manage Layer, Camera, and Timeline. These presets are the best way to see working Plugins and learn from real code.
To run a preset:
- In the Plugins panel, select a category and choose a preset. Its code loads into the Code editor.
- Click the run button at the top of the Code panel. The Plugin runs and appears on the map in the Viewer.
- Edit the code in the Code editor, then click run again to see your changes reflected on the map.
These three steps are the “change, run, observe” loop in action—the fast iteration that makes the Playground so useful for experimenting and prototyping.
Edit UI with the HTML Editor
Section titled “Edit UI with the HTML Editor”An extension’s UI is written as HTML inside the JavaScript file. In the main Code editor, this HTML lives inside a backtick string, which can be awkward to edit for anything beyond a few lines.
To make this easier, click the HTML Editor button at the top of the Code panel. This opens a dedicated editor where you can write and format the UI’s HTML, CSS, and JavaScript as you would in a normal code editor, with full syntax highlighting. When you are done, click Submit to apply your changes back to the Plugin.
Export your Plugin
Section titled “Export your Plugin”When your Plugin works as expected, click the Export plugin button in the Plugins panel to download it as a .zip file. You can install that .zip file in any Re:Earth Visualizer project. To continue developing it locally, see Set up a local development environment.